
 diglloydTools™


|

|

|

|

|

$220 SAVE $130 = 37.0% Western Digital 16.0TB Western Digital Ultrastar DC HC550 3.5-in… in Storage: Hard Drives
|

|

|

|

|
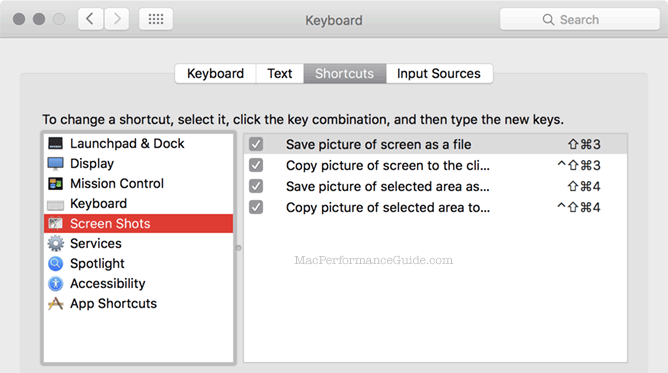
How to Capture the Screen or Window as an Image
Built into Mac OS X are handy shortcuts for capturing the screen.
The control-cmd-shift-4 is extremely useful to capture a desired area; a cursor appears, click and drag to select the desired area, which is then placed on the clipboard as an image.
By tapping the space bar after invoking some of these shortcuts, a window can be captured by itself, instead of the whole screen.
As shown below, the ^ character indicates the “control” key, the up-arrow means the shift key, and the curly thing is the “command” key.
Setting the type of image format to be captured
The default format is PNG.
To change, open a Terminal window and paste in the line of choice.
TIF is very large, but best quality. Set the format to TIFF:
defaults write com.apple.screencapture type tiff
Set the format to PNG:
defaults write com.apple.screencapture type png
Set the format to GIF:
defaults write com.apple.screencapture type gif
Set the format to PDF:
defaults write com.apple.screencapture type pdf
For the setting to take effect, logout and log back in, or enter:
killall SystemUIServer
Also useful
Turn off the shadow on a window capture:
defaults write com.apple.screencapture disable-shadow true
Grab
To neatly capture just one window, Grab is found in .

Seagate 22TB IronWolf Pro 7200 rpm SATA III 3.5" Internal NAS HDD (CMR)
SAVE $click
