
 diglloydTools™


$220 SAVE $130 = 37.0% Western Digital 16.0TB Western Digital Ultrastar DC HC550 3.5-in… in Storage: Hard Drives
|

|

|

|

|

|

|

|

|

|
Setting up a Fusion Volume
Apple’s Fusion volume technology can front-end a fast SSD to a slower hard drive.
Apple does NOT support the Fusion technology for anything but its own pre-configured Macs, so you are entering “unsupported hack” land here. This page is not a recommendation for using Fusion; it is only a how-to.
This step requires two drives. With a perfomance goal, I chose the blazing-fast 480GB Mercury Accelsior PCIe SSD and a 2TB hard drive for more storage. Except that maybe Fusion won’t work with a really fast PCIe SSD.
One should be comfortable using Terminal at the command line; commands here are shown in red type; these are what the user has entered.
A special procedure is needed to actually make a Fusion volume, not just something that looks like a Fusion volume.
Finding the disk/drive numbers to fuse
One needs to know the disks involved, since a Fusion volume cannot be created in the Disk Utility GUI.
I had a bunch of drives in this machine, the two drives I wanted to use are /dev/disk1 and /dev/disk6. It might be wise to remove or disconnect extra drives to avoid making a mistake!
llcMule:~ lloyd$ diskutil list
/dev/disk0
#:                       TYPE NAME                    SIZE       IDENTIFIER
0:      GUID_partition_scheme                        *3.0 TB     disk0
1:                        EFI                         209.7 MB   disk0s1
2:                  Apple_HFS x.Boot                  100.6 GB   disk0s2
3:                  Apple_HFS x.Master-2012-1007      960.0 GB   disk0s3
4:                  Apple_HFS x.Archive1              1.9 TB     disk0s4
/dev/disk1
#:                       TYPE NAME                    SIZE       IDENTIFIER
0:      GUID_partition_scheme                        *2.0 TB     disk1
1:                        EFI                         209.7 MB   disk1s1
2:                  Apple_HFS 2tb                     2.0 TB     disk1s2
/dev/disk2
#:                       TYPE NAME                    SIZE       IDENTIFIER
0:      GUID_partition_scheme                        *4.0 TB     disk2
1:                        EFI                         209.7 MB   disk2s1
2:                  Apple_HFS b1.Boot                 120.0 GB   disk2s3
3:                  Apple_HFS b1.Master               960.0 GB   disk2s5
4:                  Apple_HFS b1.Archive1             1.9 TB     disk2s7
5:                  Apple_HFS b1.ArchiveP             1.0 TB     disk2s9
/dev/disk3
#:                       TYPE NAME                    SIZE       IDENTIFIER
0:      GUID_partition_scheme                        *4.0 TB     disk3
1:                        EFI                         209.7 MB   disk3s1
2:                  Apple_HFS b2.Boot                 120.0 GB   disk3s3
3:                  Apple_HFS b2.Master               960.0 GB   disk3s5
4:                  Apple_HFS b2.Archive1             1.9 TB     disk3s7
5:                  Apple_HFS b2.ArchiveP             1.0 TB     disk3s9
/dev/disk4
#:                       TYPE NAME                    SIZE       IDENTIFIER
0:      GUID_partition_scheme                        *479.9 GB   disk4
1:                        EFI                         209.7 MB   disk4s1
2:                  Apple_HFS a.Boot                  120.0 GB   disk4s2
3:                  Apple_HFS a.Scratch               359.5 GB   disk4s3
/dev/disk5
#:                       TYPE NAME                    SIZE       IDENTIFIER
0:      GUID_partition_scheme                        *200.0 GB   disk5
1:                        EFI                         209.7 MB   disk5s1
2:                  Apple_HFS Mule                    199.2 GB   disk5s2
/dev/disk6
#:                       TYPE NAME                    SIZE       IDENTIFIER
0:      GUID_partition_scheme                        *479.9 GB   disk6
1:                        EFI                         209.7 MB   disk6s1
2:                  Apple_HFS owc480                  479.0 GB   disk6s2
As shown above, the two disks are disk1 and disk6 in my system.
Creating the Fusion drive
This step also requires the user of Terminal.
llcMule:~ lloyd$ diskutil cs create fusion disk1 disk6
Started CoreStorage operation
Unmounting disk1
Repartitioning disk1
Unmounting disk
Creating the partition map
Rediscovering disk1
Adding disk1s2 to Logical Volume Group
Unmounting disk6
Repartitioning disk6
Unmounting disk
Creating the partition map
Rediscovering disk6
Adding disk6s2 to Logical Volume Group
Creating Core Storage Logical Volume Group
Switching disk1s2 to Core Storage
Switching disk6s2 to Core Storage
Waiting for Logical Volume Group to appear
Discovered new Logical Volume Group "4FA6E05C-EDB9-46B6-B910-532C3F5D7C71"
Core Storage LVG UUID: 4FA6E05C-EDB9-46B6-B910-532C3F5D7C71
Finished CoreStorage operation
Creating the Fusion logical volume
Now create a logical volume (the thing that shows up on the desktop).
First, list the logical volume group; we need the volume identifier:
llcMule:~ lloyd$ diskutil cs list
CoreStorage logical volume groups (1 found)
|
+-- Logical Volume Group 4FA6E05C-EDB9-46B6-B910-532C3F5D7C71
   =========================================================
   Name:         fusion
   Size:         2479657984000 B (2.5 TB)
   Free Space:   2471084556288 B (2.5 TB)
   |
   +-< Physical Volume 17DE8028-3018-449A-AE92-C9D9E2360748
   |   ----------------------------------------------------
   |   Index:    0
   |   Disk:     disk0s2
   |   Status:   Online
   |   Size:     2000054960128 B (2.0 TB)
   |
   +-< Physical Volume 229C91BE-7FC7-4C85-89EB-956C329ADA88
       ----------------------------------------------------
       Index:    1
       Disk:     disk3s2
       Status:   Online
       Size:     479603023872 B (479.6 GB)
Now create the logical volume. Use the Logical Volume Group identifier that was displayed, choosing a size that totals just under the total of the two drives.
In the command below, “jhfs+” is the file system type, “fused’ is the volume name and the capacity is 2460GB.
llcMule:~ lloyd$ diskutil corestorage createVolume 4FA6E05C-EDB9-46B6-B910-532C3F5D7C71 jhfs+ fused 2460GB
Started CoreStorage operation
Waiting for Logical Volume to appear
Formatting file system for Logical Volume
Initialized /dev/rdisk4 as a 2 TB HFS Plus volume with a 188416k journal
Mounting disk
Core Storage LV UUID: 6E154D6D-9914-4D21-BCF6-A69A8A80D981
Core Storage disk: disk4
Finished CoreStorage operation
Viewing the ready-to-use volume
The volume icon now appears on the desktop, ready for use.
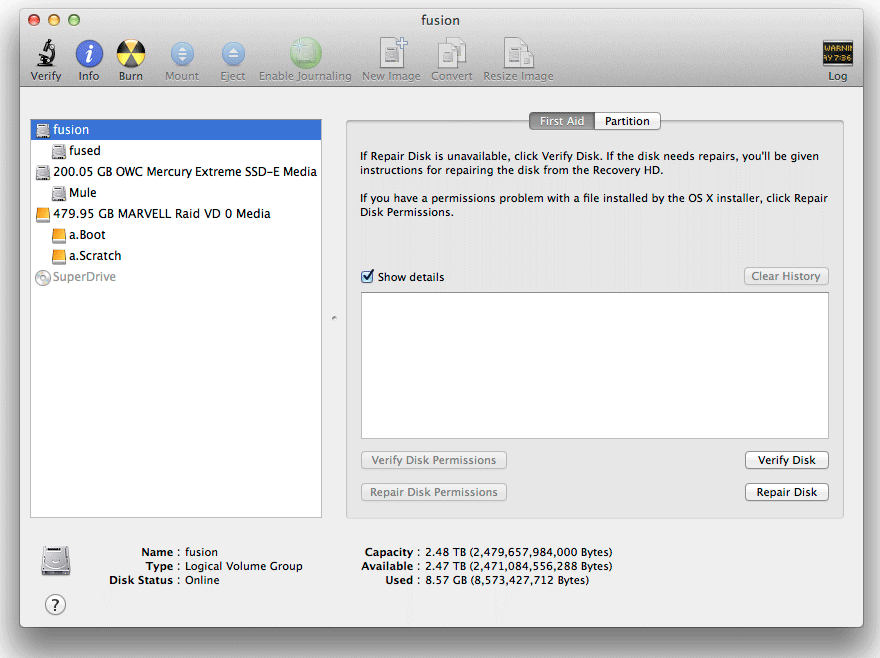
In Disk Utility, we’ll see the logical volume group and one logical volume, . The volume fused is what the user interacts with in programs (the “drive”).
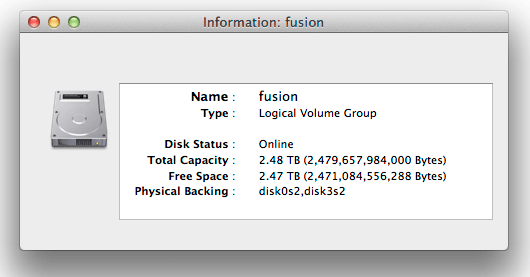
Observe that the combination of a 2TB hard drive and 480GB SSD is a 2.48TB single logical volume.
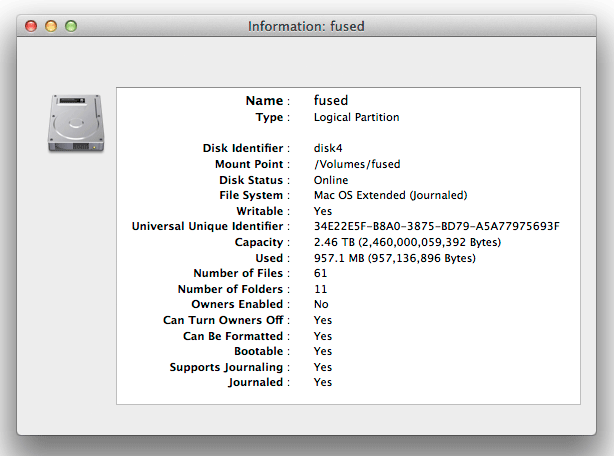
The volume information via Get Info is shown below:
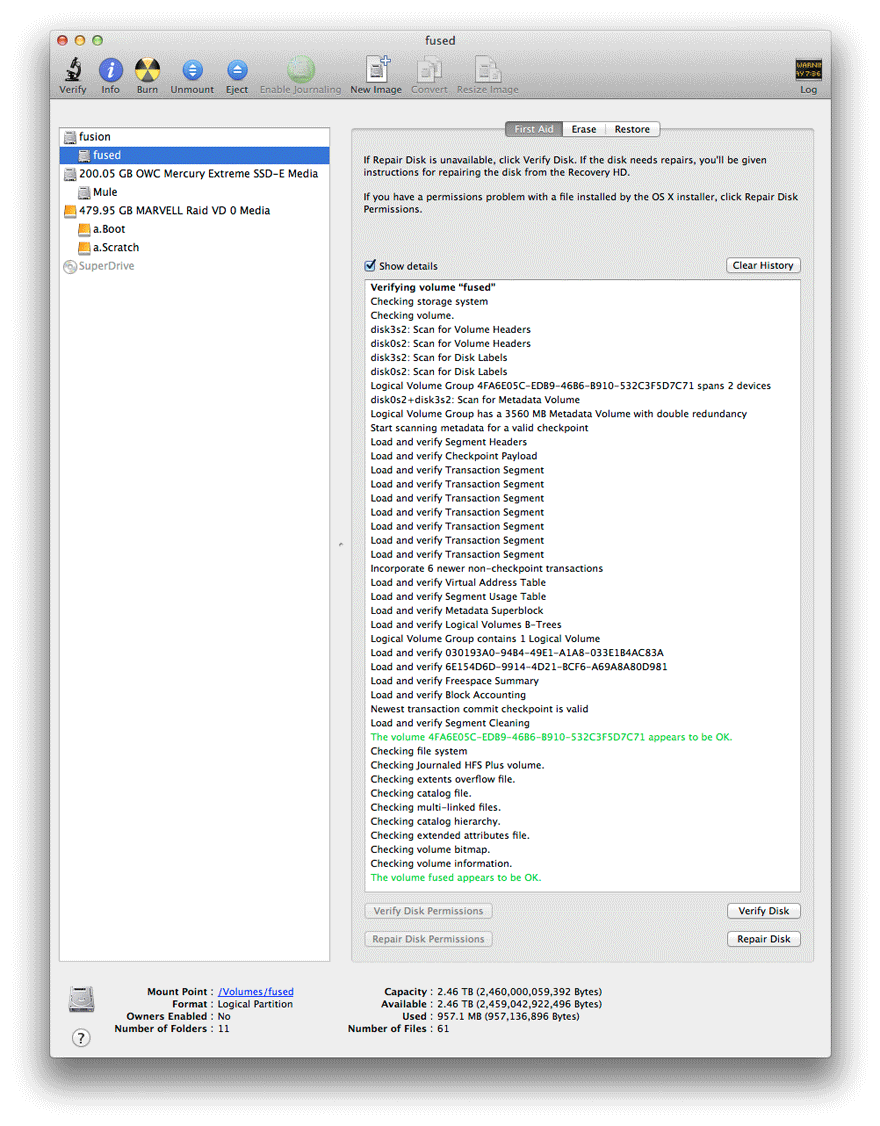
To make a basic sanity check, run First Aid. The readout is more complex than with a simple single drive:
Seagate 22TB IronWolf Pro 7200 rpm SATA III 3.5" Internal NAS HDD (CMR)
SAVE $click
