
 diglloydTools™


|

|

|

|

|

$220 SAVE $130 = 37.0% Western Digital 16.0TB Western Digital Ultrastar DC HC550 3.5-in… in Storage: Hard Drives
|

|

|

|

|
Configuring Time Machine
You will need a backup drive for Time Machine.
Do not mess around trying to share a drive for other purposes: this is a key part of your data safety, simple is best.
Ensure that Time Machine is enabled using the slider at lower left. Check this setting regularly, just in case!
Time Machine might prompt you for a backup drive, but in either case, choose to choose the backup drive (it’s actually a volume, not a disk or drive, but this is a mistake in the interface). For extra reliability, use a RAID-1 mirror volume as a Time Machine backup drive, which can tolerate complete failure of one the drives in the mirror.
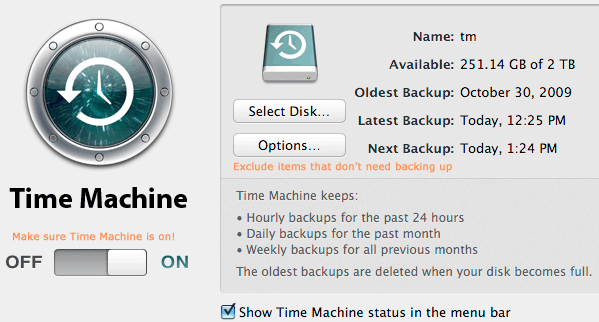
Naming the Time Machine drive
I name my Time Machine volume “tm” on all my Macs, so I know what it is.
Disable Spotlight indexing for your backup drive!
Apple’s Spotlight software loves to index everything, including your backups. This is a huge waste of time, and will interfere with your work and backups, chewing up CPU time and keeping your drives clanking away. So be sure to exclude your Time Machine backup drive from Spotlight’s indexing.
More than one Time Machine drive
You can use more than one Time Machine backup: unmount the volume, remove the hard drive from the Voyager Q, and insert another, telling Time Machine to use the new drive for its backup. In this manner, you can actually alternate Time Machine drives also.
However, most users are best served by having one Time Machine volume and using other volumes for external backups and/or additional backups using a cloning program.
Excluding items
Exclude items that should not be backed up, or don’t need to be. Here’s how.
Seagate 22TB IronWolf Pro 7200 rpm SATA III 3.5" Internal NAS HDD (CMR)
SAVE $100
